In the autumn, you want to pamper your child with something pleasant and warming. For example, you can do your own hands to tie a warm and beautiful vest for a girl. For this fit both the spokes and the hook. A girl’s vest for a girl will be tied up to novice needlewomen as well, as soon as she is guided by the scheme and description, everything will definitely work out. Consider several options for different models of vests.
Vest for a girl with knitting needles - scheme and description
Classic sleeveless jackets, vests with hoods, with buttons and without, with a high collar - types of vests that fit the girl, and at the same time will be practical during the cold season, there are many.
The main thing is to choose a vest model that the girl really likes. After all, in this thing the child will go to kindergarten or school, where she, like any girl, wants to feel the most beautiful. To make the choice easier, consider the different schemes and descriptions of knitting vests for girls.
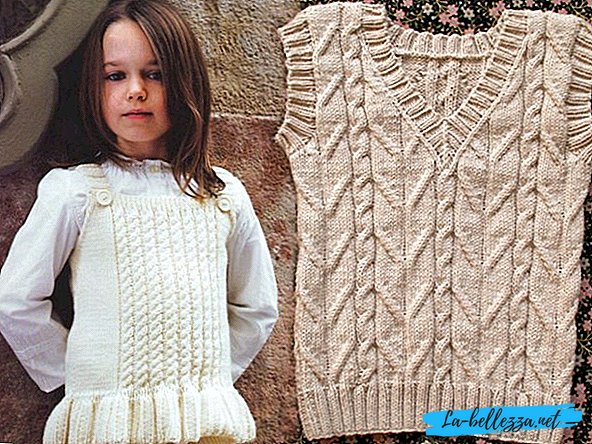
Knitting vest for girls for beginners

Knitting vests girl for beginners, you can start with this model. This girl's knitted vest for girls is perfect for any clothes, and will take care of the child in cold weather. A big plus is the presence of buttons and a hood.
Waistcoat size:74/80 (86/92) 98/104
For vest need:yarn (55% cotton, 45% polyacryl; 140 m / 50 g) - 100 (150) 200 g light gray and 50 (50) 50 g red; Knitting needles and long circular needles No. 3.5; 5 buttons with a diameter of 16 mm.
Knitting:garter. Facial and purl rows knit facial.
Knitting density:19 p. X 42 p. = 10 x 10 cm
Pattern:

Back
A red thread to dial on the needles 59 (67) 74 p. And knit garter stitch.
After 1 cm, continue to knit garter viscous light gray thread.
For openings, cut through the 18 (21) 24 cm from the initial row on both sides, close the 2 points and in each of the next 2 r. reduce on both sides another 2 (3) 4 x 1 p. = 51 (57) 62 p.
After 30 (34) 38 cm from the initial row, close all loops. Average 27 (29) 30 points form a neck; external 12 (14) 16 points are shoulders.
Left shelf
Use red thread to knit 32 (36) 40 points and knit garter stitch.
After 1 cm, continue to knit garter viscous light gray thread.
For button holes, retreat from the front edge of 2 p. And 2 p., Knit together the front one, 1 nakid. In the purl nakaz row knit facial. Perform the first hole for the button after 2 cm from the initial row, the rest - with an interval of 6 (6.5) 7 cm = 24 (28) 30 r.
At the same time, for the armhole, after 2 (24) 24 cm from the initial row from the right working edge, close 2 points and in each of the next 2 r. subtract another 2 (3) 4 x 1 p. = 28 (31) 34 p.
For the neckline, 27 (30) 33 cm from the initial row from the left working edge 5 (6) 7 p. Close and in each of the next 2 r. close another 1 x 3 p., 2 x 2 p. and 4 x 1 p.
After 30 (34) 38 cm from the initial row, the remaining 12 (14) 16 s. Close for the shoulder.
Right shelf
Use red thread to knit 32 (36) 40 points and knit garter stitch.
After 1 cm, continue to knit garter viscous light gray thread.
For an armhole, after 18 (21) 24 cm from the initial row from the left working edge of 2 n. Close and in each of the following 2 r p. subtract another 2 (3) 4 x 1 p. = 28 (31) 34 p.
For the neckline, 27 (30) 33 cm from the initial row from the right edge 5 (6) 7 p. Close and in each of the following 2 r. close another 1 x 3 p., 2 x 2 p. and 4 x 1 p.
After 30 (34) 38 cm from the initial row, the remaining 12 (14) 16 s. Close for the shoulder.
Hood
Use a light gray thread to make 58 knitting needles (70) 80 p. And knit a garter stitch.
For lateral bevels in each of the following 16 (12) 10-m p. on both sides, subtract 4 (6) 8 x 1 p. = 50 (58) 64 p.
After 16 (18) 20 cm from the initial row, close all loops.
Assembly
Stretch the details according to the pattern, moisten and allow to dry.
Shoulder seams to perform mattress suture.
For the slats on the edges of the armhole with a red thread, type on the spokes for each slat by 48 (52) 56 p. And knit 1 cm garter stitch. Then all loops are free to close.
Side seams and stitches seams to perform mattress seam. The upper seam of the hood to perform mattress seam. Sew the hood to the neck with a mattress seam.
For slats along the edges of the shelves and along the edge of the hood with a red thread on circular needles No. 3.5, uniformly dial 156 (190) 204 p. And knit 1 cm garter stitch. Then all loops are free to close.
Sew buttons.
Children's vest in school with a pattern

Knitting children's vest for a girl is a pleasure for both a needlewoman and a baby. After all, going to school in a beautiful thing that a mother or sister with knitting needles tied with love is a reason for joy every day.
Waistcoat size: at the age of 2 (4) 6 (8) 10 years.
For vest need:yarn (100% wool; 50 g / 100 m) - 2 (3) 3 (3) 4 skeins pale green, 1 (1) 1 (1) 1 skein yellow, 1 (1) 1 (1) 1 skein pale - pink; circular needles No. 4 and 5 80 cm long; for the manufacture of buttons 4 rings for curtains with a diameter of 11 mm.
Chest width:56 (60) 64 (68) 76 cm
Waistcoat Length: 32 (35) 38 (41) 44 cm
Knitting density:16 p. X 22 p. = 10 x 10 cm, connected by a pearl pattern.
Important: before the armhole, the product is knitted in circular needles in rows in the forward and reverse directions with a single cloth.
Pearl pattern:1st p. (= izn. row): * 1 persons., 1 izn. *, repeat from * to * to the end of the row.
2nd b.: Knit loops on the pattern (facial - facial, purl - purl).
3rd R.: * 1 out., 1 person *, repeat from * to * to the end of the row.
4th b.: Knit loops on pattern (facial - facial, purl - purl). Repeat these 4 rows.
Back and shelves
On the needles No. 4 dial a thread of pale pink 128 (139) 150 (161) 172 p. And knit 2 p. facial. Go to the pale green thread and knitting needles No. 5, knit 1 p. facial (= person. row). Continue the work with a pearl pattern and knit until the product is 6 (7) 8 (9) 10 cm long, finish the faces. beside. Move the loops to the other end of the knitting needles, switch to the needles No. 4 and turn on the yellow thread, tie 4 p. facial, evenly reducing in the 1st p. loops up to 97 (105) 113 (121) 129 points on the needles.
Then go to the needles number 5 and a pale green thread, knit 1 p. face and continue to work, distributing the loops of the patterns in the following sequence: 1 (0) 4 (3) 2 p. pearl pattern, * 5 p. front smooth surface, 5 p. pearl pattern *, repeat from * to *, finish 5 p. front smooth surface, 1 (0) 4 (3) 2 p. pearl pattern.
When the length of the part is 17 (20) 23 (26) 29 cm (last row = izn. Row), close the loop for armholes on both sides: knit 21 (23) 25 (27) 29 s., Close 6 s for armhole , knit 43 (47) 51 (55) 59 points, close 6 points for the second armhole, knit 21 (23) 25 (27) 29 loops.
Left shelf
On the loops of the left shelf, continue knitting, lowering it from the inner edge to form an armhole in each 2nd p. 3 times on 1 p. Perform the executions in front of the chrome. loop, knitting together on 2 s. according to the figure - facial crossed or purse crossed. After that, the needles will remain 18 (20) 22 (24) 26 p. Next, knit straight until the height of the armhole is 6 cm.
From the outer edge, temporarily leave the extreme 7 (8) 9 (10) 11 s for the buckle plate and continue to knit on the remaining loops.
For the formation of the neck from the outer edge, subtract in each 2nd p. 4 times 1 p. = 7 (8) 9 (10) 11 p. Continue to knit straight until the armhole height is 14 (15) 16 (17) 18 cm. Then close the loop.
Right shelf
Knit similar to the left, but in a mirror image, attaching the thread from the wrong side of the left loop of the right shelf.
Back
Attach the thread at the left loop back on the wrong side and knit as follows: 3 times in each 2nd p. subtract 1 p. from both sides = 37 (41) 45 (49) 53 p. left on the knitting needles. Next, knit straight until the armhole height is 12 (13) 14 (15) 16 cm.
Temporarily leave the average of 19 (21) 23 (25) 27 p. And both sides finish separately.
From the inner edge for the formation of the neck, subtract in each 2nd p. 2 times 1 p.
Next comes the assembly stage.
Straps armhole
On the edge of the armhole from the front side, dial with yellow thread 45 (49) 53 (67) section and knit 2 p. facial. Loops close in purl row.
Plan the second armhole to perform similarly.
Run shoulder seams including straps.
Bake throat
Knit with needles No. 4 with a light pink thread. Knit with the front side left 7 (8) 9 (10) 11 p. Of the right wing, dial 10 (12) 14 (16) 18 p. Along the edge of the neck to the shoulder seam, 4 p. From the shoulder seam and to the left back loops , knit facial left 19 (21) 23 (25) 27 n. of the back, dial 4 n. to the shoulder seam, 10 (12) 14 (16) 18 n. down to the left hinge of the left shelf and knit them facial = 61 (69 ) 77 (85) 93 p. Execute 2 p. facial. Loops close in purl row.
Left strap fasteners
Use a yellow thread to dial from the front side along the front edge of the left shelf of the loop - at the rate of about 3 items from 4 p. = 50 (54) 58 (62) 66 p. Run 2 p. facial. All loops close in the purl row.
Right strap fastener
Hinges on the front edge of the right shelf type a thread of pale pink = 50 (54) 58 (62) 66 p. Run 1 p. facial. Make holes for buttons in the next row: 18 (19) 20 (21) 22 persons., * 2 paragraph. Fasten the front together, dial 2 new paragraph, 2 paragraph. Fasten the front together, 5 (6) 7 (8) 9 persons. *, repeat from * to * 3 times, finish: 2 points. knit together the front, type new 2 items, 2 points. knit together the face, 1 persons. In the seamy row, the loops are closed, tying new loops for 1 person., 1 out.
Embroidered flowers
Each flower consists of 4 stitches of a stitch "loop vkrepk" (= petals) and the middle in the form of a double cross. Embroidery should be done only on the shelves, color distribution - see photo. The ends of the threads fasten.
Buttons
Make 4 buttons: trim the rings over the edge with 18 stitches of the lath seam. Then, inside each ring, use a contrasting thread to make a “cobweb” of three large intersecting stitches and “rehash” them with a stitch “back needle”, making a stitch along each of the 6 rays of the “cobweb”. Sew buttons.
Wash the product, slightly squeeze it, spread it out and leave it to dry.
Crochet girl's waistcoat
Among the unusual and practical things that can be crocheted, of course there are vests. There are many varieties of them - from complex ones to those that can be tied up by beginners. A big plus in the choice of crochet is speed, so if you urgently need to tie a warmed cape to your child, a hook is the most suitable option.
Simple model for beginners

A crocheted vest for a girl is rather complicated in execution, but it always looks unusual and interesting. This vest will refresh the image of the baby. Knitting a girl's vest for beginners may seem complicated, but let's try to figure out the scheme and description together. And if it is too complicated, we will use video lessons.
This vest model is made with motifs from sectional dyeing yarn.
Waistcoat size: 3-4 years.
For vest need: Nako Spaghetti Effect yarn - 4 skeins (25% wool, 75% acrylic, 100g / 60m) sectional dyeing and residues and 1 skein of contrasting color. Kryusou number 7, 2 buttons.
Motif for the back: thread sectional dyeing dial 10 air loops, connect into a ring. Knit 1-7 rows of pattern 1.
Shelf motif (link 2 symmetrically): thread sectional dyeing dial 10 air loops, connect into a ring. Knit 1-9 rows of pattern 2.
Assembly: sew the shoulders and sides.
Binding: tie a neck with a contrasting thread, shelves with single crochets. In the same way to tie each armhole.
Button loops: connect the threads to the place where there should be a buttonhole, dial 6 in / p, connecting bar in the same place.
Buttons bind in columns w / o behind the back wall in a spiral - 6 cm.

Video lesson
To tie a crochet openwork vest for a girl, you can use a variety of diagrams and descriptions, and you can watch the detailed process on the video - it will become clearer, and things will go much faster.
Video lesson "How to tie a girl's vest"
Here is the option video with knitting vests for girls knitting: