This article is devoted to complete women who love to create with their own hands, do not cease to learn and learn new things.
Dress sewing is a long and laborious process that requires accurate knowledge and basic skills of a seamstress. The first very important stage - the removal of measures. From a competent approach to this issue depends on further success. Next, you need to properly design the pattern ("base" or "base", as it is called) by the measurements taken. And only after that you can proceed directly to tailoring. The most difficult stage is the construction of the pattern, so we’ll dwell on it in more detail.
Ready-made patterns of dresses for obese women can be downloaded for free in a few minutes on the site of the Burda and other equally well-known sources, but we offer you to learn how to cut it yourself, and then please yourself with fashionable new clothes. we can say that this article is like a box with precious tips that you managed to find on the Internet.
Patterns for dresses (for obese women)
If you have a basic pattern of a semi-fitting dress, you can create and sew absolutely everything that you want. Simple configurations with the base will help to sew, to tie the outfit of any complexity. Even knitting and crocheting is much easier. With the description of the pattern and the main pattern, you can create any dress you like in the picture.
Videos for novice needlewomen
Video tutorials for beginners with a detailed description of the whole process.
How to take measurements
//www.youtube.com/watch?v=m5sXhoctbqo
Lesson 1
//www.youtube.com/watch?v=IvG58CsDqDc
Lesson 2
//www.youtube.com/watch?v=ODtM3ba4iw4
Lesson 3
//www.youtube.com/watch?v=Ko5RM2IlpIY
Lesson 4
//www.youtube.com/watch?v=iZi6jQh68y0
Lesson 5
//www.youtube.com/watch?v=OInj2-fFFyM
Lesson 6
//www.youtube.com/watch?v=wkrXgz1WMOw
Lesson 7
//www.youtube.com/watch?v=xqSSGxHrPbY
Lesson 8
//www.youtube.com/watch?v=tyvbZmsehT4
Lesson 9
//www.youtube.com/watch?v=4xTmA55NWxo
Lesson 10
//www.youtube.com/watch?v=HKUchLNG3HU
Lesson 11
//www.youtube.com/watch?v=jOk0stBOipg
Lesson 12
//www.youtube.com/watch?v=yiPNI2fKM-A
Step-by-step construction instructions (photo)
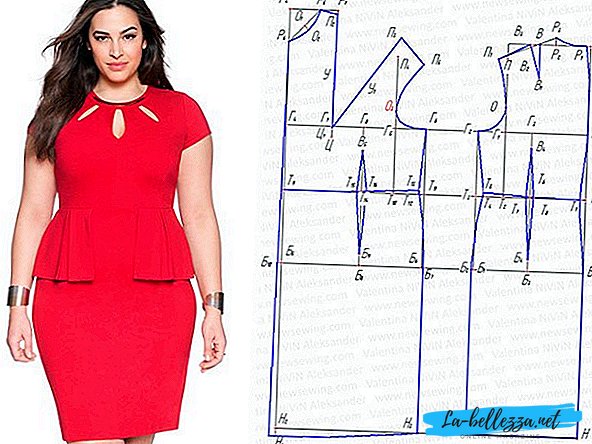
Sewing on a machine does not take much time if you are armed with a “base”, which we will help you to make up competently. We take for example size 54.
Taking measurements:
- DI - Length of the product. From the seventh cervical vertebra to the desired length (100 cm).
- Gpr - Depth of armhole. From the seventh cervical vertebra to the armpit line (21).
- DST - The length of the back to the waist. From the seventh vertebra to the waist line (39).
- Shs - The width of the backrest. Measure horizontally across the shoulder blades, between the upper corners of the underarms (19.5).
- Ssh - Semi-neck. The measuring tape should run along the base of the neck, behind the seventh cervical vertebra, in front of the jugular cavity (recess) (19).
- Crl - Semi girth chest 1st. The horizontal line is behind the protruding points of the shoulder blades, in front of the base of the chest (49).
- Crll - Polupvat breast 2nd. The line runs along the protruding points of the shoulder blades and chest (54).
- PTO - The magnitude of the solution undercut. Vertical line from the base of the chest to the highest point (12).
- St - Polupvat waist. Horizontal line at the narrowest point at waist level (47).
- Sat - Half hip. measured horizontally on the protruding points of the buttocks with a small allowance on the protruding abdomen (60).
- Vr - Sprout height. Parallel to the spine from the shoulder at the base of the neck to the waistline (41).
- Vps - The height of the shoulder backrest. Measure back from the point of articulation of the arm with the shoulder to the waist (36).
- Shpr - Armhole width. Measure horizontally at hand: from the point of articulation of the arm with the body from the back to the articulation of the arm with the body from the front (12, 5).
- Db - Side length. Measure from the back of the upper edge of the ruler, located in the armpit, to the waist line (17).
- PD - shoulder length. Measured along the shoulder from the neck to the joining of the arm with the body (13).
- Vg - Breast height. From the base of the neck to the protruding part of the chest (29.5).
- Runway - The height of the shoulder before. From the point of connection of the arm with the shoulder to the waist (35).
- Dpt - Front length to waist. Measure from the shoulder at the base of the neck to the waistline (44).
- Cg - Measure horizontally between the most prominent points of the chest (11).
- Nn - Measured horizontally above the base of the chest between the angles of the armpits.
- ShpII - The width of the front on the protruding points of the chest (control measurement). It is measured horizontally between the angles of the armpits at the most prominent points of the chest (23.5).
- Dr - The length of the sleeve. From the highest point of the shoulder to the desired length (58).
- Drl - Sleeve length to elbow. From the highest point of the shoulder to the elbow (34).
- Ohr - Hand girth. Measure the fullest upper arm (34).
- Oz - Wrist circumference. Girth of the brush, taking into account the bones (19).
Increments: For a free fit, we add 4–5 cm to the measurement of the second semi-girth of the CrII chest, to the measure of the semi-grip of the thighs Sb - 3 cm and to the semi-girth measure of the waist St - 2 cm.
Pattern construction:
Getting to build.In the right corner we draw a right angle with vertex at the point R.From point P we lay down the length of the product.Di(100 cm) and put a point H.From point P down, we postpone the depth of the armhole (Gpr= 21 cm) and denote the point R. From point P down lay the length of the back to the waist (Dst = 39 cm) and mark the pointT.
From pointT down is usually delayed 18 - 19 cm. We take the average 18,5 see and put an endB.

From points G, T, B and H To the left at right angles we draw horizontal lines: depths of the armhole, waist, hips and bottom.
From point G to the left, lay the width of the backrestShs (19.5) plus0,5 cm (increase free fit) and put a full stopG1 :
GG1 = Shs + 0.5 = 19.5 + 0.5 = 20 cm.

From pointG1 to the left we set aside half of the width of armhole 1 see and mark the pointG2:
G1 G2 = Shpr: 2 - 1 = (12.5: 2) -1 = 5.25 cm.
From point G2 draw a straight line down and at the intersection of it with the waist and hip lines put a dotT2 and B1.
From pointR we postpone to the left 1/3 half neck SS (19cm) a plus 1 cm and determine the pointP1:
PP1 = 1/3 CW +1 = 19:3+1=7,3cm.

From the point P1 upward we postpone the difference between the measures of the height of the germ BP (41cm)and back length to waist DST (39cm) and mark the pointP2:
P1P2 = BP - Dst = 41 - 39 = 2 cm.
Points R and P2 connect a concave smooth curve. We get the back line neckline (sprout line).
From pointT1 upward we lay back the measured measure of the height of the shoulder backrest Vps (36 cm) and draw a pointP.

From pointG1 upward postponing 1/3 distance segment G1P and draw t.ABOUT. A circus from a pointABOUT we lead to the left through the pointP arc.
From point P2 as from the center, with a radius equal to 15 cm (Measured shoulder length Dp (13cm) a plus2cm on the dart), draw an arc to the intersection with the previously constructed arc. At the intersection of two arcs put a pointP1.
R2P1= 13 + 2 = 15cm.
Points R2 andP1 connect

Connecting the dots P1, O and G2 smooth curve, as shown in Figure 12, we complete the construction of the armhole back.
From pointR2 left on the line R2P1 set aside 1/3 of the measured length of the shoulder arm Dp and set TB;
Р2В = 13: 3 = 4,3sm.
From point B down we draw a vertical line of length 8 cm and put the point B1.
From pointAT left on the line Р2П1put off 2 cm and put an endAT 2. From the point IN 1 through pointAT 2 draw a line of length 8 cm and put an endIN 3. Points V3P1 we connect with a straight line and get the back shoulder line.

From pointT2 we put off to the right 2 cm and put an endT3. Points T3 and G2 connect
From pointT3 upward postponing 1 cm and put an endT4dots T4 and T connect a smooth curve.

From pointB1 we postpone to the left1/2 differences between half hip measures C6 with a free fit (60 + 3 = 63 cm) and the second chest girth CrII with a free fit (54 + 4 = 58cm) and put an endB2:
B1, B2 = (63-58): 2 = 2.5 cm. Points G4 and B2 connect a smooth curve.
From pointH to the left, we set aside a value that equals the width of the back along the thighs (see the drawing, this is the distance BB2) a plus 2-3 cm and put an endН1. Points Н1 and B2 we connect by a straight line. From point Н1 upward postponing 1cm and put an endH2. Points H2 and Hconnect a smooth curve.
Distance GG1 divide in half and put an endG3. From point G3 draw a vertical line down and at the intersection of it with the waist line put a dotT5with the line of the hips - pointB3. From pointG3 put it down 4 cm and put an endAT 4, but from the point B3 up - 3 cm and put an endB4.
From pointT5 right and left along the waist line set aside 1 cm and put an endT6 and T7which we connect with points AT 4 and B4.


Bottom line HH1 continue left. From point Н1 put off approximately 45-50 cm and put an endH3. From t.H3 up we draw a vertical line. From points G2, T2, B2to the left we draw horizontal lines to the intersection with the vertical. The points of intersection with the vertical line are denoted respectively G4, T8, B5.
From pointR4 To the right, we postpone the measured measure of the half-chest second crII with a free fit (54 + 4) minus back width with gain (according to drawing GG = 20 cm) and minus armhole width (measure taken 12.5 cm) and draw a pointG5:
G4G5 = 58-20-12,5 = 25.5 cm.
Through point G5 down we draw a vertical line, at the intersection of which we put a dot T9.

From pointG5 right half the width of the armholeSpra (12.5) a plus 1 cm and mark the pointG6:
G5G6 = 12.5: 2 + 1 = 7.25 cm.
From pointG6 draw a vertical line down and put a period on its intersection with horizontal linesT10 and point B6.
From pointT8 upward we lay off the measured length measurement anterior to the waist DPT (44 cm) and denote the pointP3.
From pointP3 we draw a horizontal line to the right and put it on 1/3 half neck Us! (19cm) a plus 1 cm and put t.P4:
R3R4= 19: 3 + 1 = 7.3 cm.
From pointP3 put it down 1/3 half neck SS (19cm) a plus 1.5 cm and put an endP5:
Р3Р5 = 19: 3 + 1.5 = 7.8 cm.
PointsR4 and P5 connect the line, divide it in half and the middle we denote the pointO1. From pointO1 lay down at right angles 1.25 cm and denote the point02. Points P5, 02 and P4connect a smooth curve and get the line of the neck of the shelf.
From pointG4 right postponed measure of the center of the chest Cg (11 cm) and put an endG7. PointsP4 and R7 connect
From pointP4 down extending the line R4G7, postpone the measured height of the chest Br (29.5 cm)and mark the pointC.
On the same line from the pointC upward postponing 2.5 cm and put an endC 1. At this point the chest tuck ends.
From pointC upward we postpone the measured measure of the tuck mortar PTO (12 cm) and put an endW. From the pointCas from the center, through the pointHave right arc draw.

From pointHave on the conducted arc we postpone the difference between the measures of the half-width of the chest of the second CrII (54cm) and poluobhvat breast first CgI (49cm) and put an endU1.
UU1 = CrII - CrI = 54 - 49 = 5cm You can make this construction with compasses.
From the pointHaveas from the center, by radius 5cm draw an arc to the intersection with the previously constructed arc. Intersection mark U1.
Through pointC1 and point U1 draw a straight line, continuing it up by an amount equal to the distance C1P4 and put an endP2:
C1P2 = C1P4.
On the straight T9G5extending it up from the pointT9 put off the measured height of the shoulder before Runway (35 cm) and put pointsP3.

From pointG5 upward postponing 1/4 distances G5P3 (4.5 cm) and put a point03. Point 03 -check Point. When waving a sleeve in the armhole, it connects with the mark on the sleeve to the pointABOUT
From the point03 compass through point P3 draw an arc to the right.
From the pointP2as from the center, with a radius equal to the measured length of the shoulder DPL, (in our case 13cm) draw an arc to the intersection with the previously constructed arc and set a pointP4. Points P4, 03 and
R6 connect a smooth curve, thus completing the construction of the armhole before.
From pointT10 we postpone to the left 1.5 cm and put an endT11. PointG6 and T11 we connect a straight line.
From pointT11 upward postponing 1 cm and put an endT12. PointsT8 and T12 connect a smooth curve.

From pointB6 we put off to the right 1/2 differences between half hip measures Sat with a free fit (60 + 3 = 63 cm) and the second chest girth CrII with a free fit (54 + 4 = 58cm) and put an endB7:
B6 B7 = (63-58): 2 = 2.5 cm.
TrchkuT12 and B7 connect a smooth curve.
From pointH3 to the right, we set aside a value that is equal to the width of the front of the thighs (see the drawing, this is the distance B5B7), a plus 2-3 cm and put an endH4. Points B7 and H4we connect by a straight line. From pointH4 upward postponing 1 cm and put an endH5.

From pointH3 put it down 2 cm and put an endH6. PointsH6 andH5 connect a smooth curve.
DistanceG7G5 divide in half and put t.G8. From point G8 we draw a vertical line down, and at the intersection with the waist and hip lines we put dotsT13 and B8. From pointG8 put it down 6 cmbut from the pointB8 up - 2 cm and put dotsB5 and B9.

From pointT13 right and left put aside 1.25 cm and put an endT14 and T15that connect with ourB5 and B9.

Construction completed.

Ready-made patterns for different models (styles for full ones)
If you like to sew and you already have a little experience in sewing clothes, you should remember the main rule of an experienced seamstress: “Measure seven times, cut once”. It is very important to pay due attention to the calculations, especially when it comes to obese women.
Pattern evening dress
Sewing blouses, skirts, pants is a very complicated and long process, but creating a beautiful evening dress requires a little more effort and patience.
Long triumphant dresses can be made of guipure and chiffon. Ladies of small stature can combine these fabrics and create a vertical openwork line in front, which visually makes them taller and slimmer.


Pattern simple summer dress for full girls
Simple low-waisted models that are created with one stitch are perfect for summer. Loose in the floor fashionable print flowers - the trend of 2016, and I want to present you a stylish beautiful dress for sunny days.


For knitwear
For winter, you can choose models of wool and combination yarn. The season autumn-winter is a large number of simple models that can easily be given off as a home dress.


New 2016 - universal "case"
We sew themselves outfit from black fabric (or in a cage) of a straight silhouette with a cutting sleeve (can be converted into raglan), which is ideal for a young and elderly lady.
Option 1

Option 2

Dress with drapery
You can quickly and easily sew a dress with clutches (but if you have little fabric, you can stop at the “trapezium” style), which will look good on a lady with a belly.
To do this, you only need to sew a beautiful bodice and equip yourself with a huge piece of fabric that you will beautifully combine. You will have a high-waisted sundress that will beautifully hide all the flaws in the figure.