If you want to decorate your house beautifully with your own hands, but do not know where to start, we offer you interesting ideas for decoration that you can easily repeat yourself.
Home decor with your own hands
In order to decorate your apartment and make it even more comfortable, it is not necessary to spend fabulous money on the decorator. You can become your own master of interior design. For this you need to arm yourself with the necessary materials and patience.
Florarium

It is necessary:
- glass container with or without lid (aquarium, vase, jar)
- soil that matches the plants
- drainage (sand, small pebbles, expanded clay, broken brick)
- activated or charcoal
- plants
- decorative elements for decoration (figures, houses, branches, snags)
- tools (spatula or spoon, long tweezers, sprayer, watering can, scissors)
- Prepare the container by washing and drying it (you can pour boiling water on it).
2. Pour the first layer - 3-4 cm of sand (you can use expanded clay, pebbles or decorative stones).
3. Put the second layer - activated charcoal (can be pharmaceutical in tablets) or the usual small wood. This layer will absorb all harmful chemicals, prevent the appearance of mold and mildew.

4. Pour 4-9 cm of moist soil (for desert plants - sifted sand, for tropical - ready substrate).
5. To level the soil and make a recess for the plant. Peel the roots of the plant from the ground of the pot. Plant and sprinkle with soil. Make sure that the large leaves do not touch the walls of the container, otherwise condensate may constantly accumulate on them and they will rot.

6. Water the flower and add decorative elements. Done!
Felt Carpet

The main material is multicolored felt strips (or any other dense material: an old blanket or rug, coat, sweater, jacket). You can glue the pieces with any glue, in this case glue gun (hot glue) is used. The main feature of the carpet is a beautiful color transition from one shade to another.

The technology of creating a carpet is very simple: apply a strip of glue to the felt and roll up tightly with a roll, the next tape to glue into the joint of the previous one. You can make several large round or oval "rolls" (of any other fancy shape) and beautifully put together, giving the form you want. Beautifully put them together, and between the fill stripes.

Pillow knot
In order to make such a cunning and beautiful pillow, you only need to sew a "pipe", which after you need to tie an interesting knot.
For this you will need:
- a piece of knitted fabric or cotton (wool) tights
- synthetic winterizer
- cardboard roll of paper towels or toilet paper
- long stick for tamping sintepon
- needle with thread
To simplify the process, take the pantyhose and cut off all the excess (you can also use the sleeves from the old jacket, socks, stockings). Connect all the pieces and make a long "sausage".
But if you are not looking for easy ways and you want to create a new chic decor for the house, take the fabric and cut into strips 20-30 cm. The length of the “pipe” is about 3 meters.
After building a roll and using it fill the "tube" with cotton wool or padding. Use the wand for tamping. Tighten tight and tight, then sew up the edges.

Tie any original knot, pleasing your home and guests with an unusual pillow.
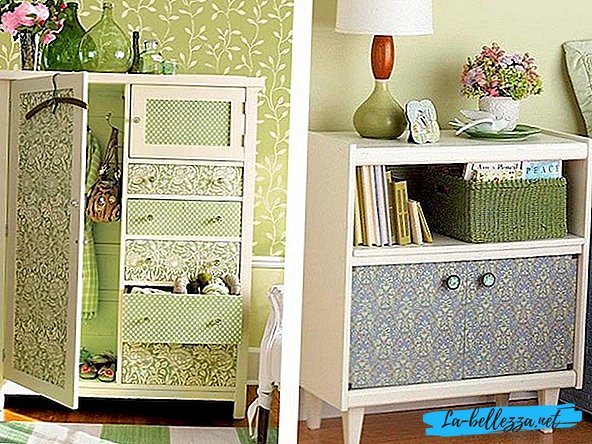
Decor furniture wallpaper
If you want to refresh the interior or just decorate the old boring wardrobe, you can resort to the old proven way to decorate furniture with wallpaper.

Materials and tools:
- wallpaper:
- sandpaper;
- primer;
- wallpaper paste;
- water-based varnish.
The decor technology is very simple:
- Restore and paint the furniture.
- Clean the wooden surface and prime.
- Glue wallpaper.
- Varnish.
Examples for inspiration:


Holder to charge the phone

If you have hard work and a little free time, forget about the phone lying on the floor. The phone holder is probably the most necessary purchase, so you can easily make such a gift to your friends. They will certainly be very happy, since it is impossible to buy such a “gadget” in the store, and not everyone has enough skills.
It is necessary:
- Empty cosmetic bottle
- scissors
- glue
- pencil
- sandpaper
- brush
- paper napkin
Process of creation:
- Mark the shape of the holder with a pen.
- Cut out
3. Thoroughly wash, dry and sand with sandpaper.
4. Dressing - you can glue over the napkin or simply paint it with acrylic paints. If you want to add straziki, pebbles, ribbons, beads.
In this case, decorate is just a beautiful napkin. It is necessary to apply glue on the bottle, gently attach a napkin and align all the folds. Top also apply a layer of glue. Trim uneven edges, cut the place for charging, beautifully arrange the bottom.

Done!
Patchwork patchwork quilt

Instruments:
- ruler,
- fabric or patches available,
- roller knife
- scissors,
- thread,
- synthetic winterizer
- sewing machine.
Materials:
- the cloth;
- synthetic winterizer (100 mm) or other filler;
- thread.
- Cut the required number of squares of different colors 12x12 (in the sewn form they will be 10x10). Plaid 150 * 160 cm = 240 pcs. The same is necessary for the seamy side.
- Cut the sinteponovy squares of 9,5х9,5 cm.
- Make blanks: fabric-sintepon-fabric.
4. We put the assembled blank under the presser foot so that 1 cm remains from the corner to the beginning of the stitch. Then align the layers of the upper and lower fabrics so that their edges coincide, and lower the needle only. With the needle dipped into the fabric, turn the workpiece and sew the block. You must stop 1 cm before the end of the block so that you will have the same seam allowance as at the beginning of the line. In order to roughly understand where to stop, you can, just as at the beginning of the stitch, raise the foot, unfold the fabric and look at the remaining distance along the markings on the plate.
5. After you finish stitching the workpiece, do not cut the thread. Just lift the foot, pull the thread and proceed to the next square.
6. When all the blanks are stitched, we end up with a long “garland”. Cut the connection.

7. Next, do4 and 5 steps, getting blanks, cross-stitched and ready for assembly (sew the second line as slowly as possible, especially to the middle of the block, so that the fabric feed is even).

8. Collect the workpiece in rows. To do this, add twoinverse by the side inside and sew them together with the same 1 cm seam allowance.

9. When interconnecting rows, it is important that the seam allowances go in the same direction. Sewing up the stitches, lift the needle and foot, and then use a plasticine knife (a very convenient device!) To move the seam allowances in the right direction. Then lower the needle and foot again and continue to sew the rows without cutting the threads.

So that in the place of joining the seams there are no holes, it is better to grab the allowances of 1 cm. And do not forget about the tack at the beginning and end of each line.
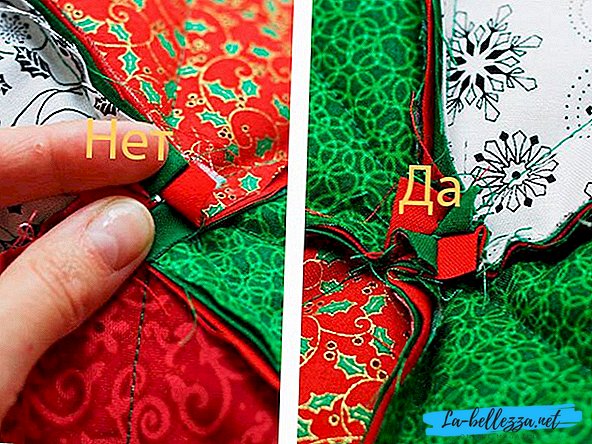
10. The most difficult thing is behind and it remains to simply stitch the blanket around the perimeter with the same allowance of 1 cm.
11. Cut the seam allowances. They are cut in such a way that 2-3 mm left to the line. The distance between the fringe - at your discretion. In my opinion, it is ideal to cut allowances at every 0.5-0.6 mm. It is possible more often, but not less.

The plaid is ready!
Christmas gnomes

To create such wonderful gnomes you will need:
- Gray and red felt
- Knitted fabric
- White thread and needle
- Scissors, white paper, pencil
- Cotton wool (or any other synthetic filler)
- Glue
- Button
- Wooden legs
- A strand of white artificial hair
- Red paint
- Make a pattern of hats and torso (you can simply attach a white sheet of paper to the monitor and circle around the contour).
- Embroider the snowflakes on the hat with white threads.
- Cut the edges of the cap, thus making a "brush".
- Sew with white threads with a "looped" overlay stitch the back part of the cap and handle.

5. Decorate the body with white snowflakes.
6. Sew the sides and bottom, leaving a hole.
7. Fill the torso with cotton.

8. Sew small narrow “tubes” of knitted fabric - legs for the gnome.
9. Sew them to the back of the body, closing the hole.
10. You can make socks out of striped knitted fabric.

11. Make a beard, gathering a strand of white artificial hair (you can simply wind the white thread) and sew it to the body.
12. Sew a button - the nose of the gnome.
13. Paint red wooden shoes (such blanks can be found in any department for needlework).
14. Glue the shoes to the legs.
15. Connect the hat and torso (with a small lace at the base of the arm).
16. Wind up the white thread on the brush (you get a pen).

Done!
Soft bed headboard

Materials and tools:
- plywood sheet;
- a section of dense fabric (canvas for paintings was used in this project);
- nails;
- glue (spray-glue was used in the project);
- padding polyester or batting;
- scissors;
- furniture stapler.
- Cut a rectangle of the required size from a sheet of plywood. Put 3-4 layers of batting or padding, leaving a reserve of 10 cm on the sides.
2. Layer after layer, glue the batting to the plywood (spray adhesive can be used). After attaching the batting to the back side, well pulling the material.

3. Turn the headboard over. Spray the surface of the wadding with an aerosol glue and, starting from one side, gently roll the fabric onto the batting. Press and smooth the fabric well, so that there are no bubbles, folds and distortions. After the glue dries, attach the canvas to the back of the plywood. Well tightening the canvas, wrap around the frame and secure with a furniture stapler.

4. With the help of nails you can build any pattern, but we will make a neat line around the perimeter.
Make the same markings on each edge and draw a string that will serve as an auxiliary line.

5. Mark the places for nails and drive them in (you can use furniture buttons).

6. Attach the headboard to the wall.