Any event in a kindergarten or school is accompanied by a costume concert for children for their parents. The work of creating the image rests with the parents. Do not worry, in fact, all the costumes can be made independently with your own hands.
Today's workshop is dedicated to the story of how to sew a gnome costume for a boy with his own hands.
DIY gnome costume for a boy: a blouse or vest
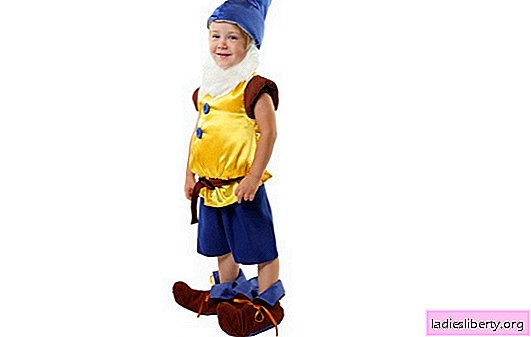
In order to look like a gnome, you need to be dressed like a gnome. The main attributes when creating a gnome costume for a boy with his own hands are: a cap, jacket or vest, pants or shorts and shoes. You can also complement the image with leggings if you put on shorts, a beard and a wide belt on the jacket.
Decide on the color scheme of the entire costume. If the jacket will be combined in color with the pants, then the cap should be of a different color, and if the jacket will not match in color with the pants, then the cap must be combined with the pants. It is nice to look not only at the costume, but also note the taste preferences of the one who chose and completed the fabrics of the whole image as a whole.
The gnome's blouse is usually wraparound and always with buttons and a large strap
In order to sew a jacket, you will need a fabric of one or two colors, a thread, a centimeter tape, large buttons.
Stage 1
Take measurements on the child and transfer them to the fabric according to these patterns.

If it’s difficult for you, and you are confused with measurements, then it’s possible to make it easier: put a fabric on the table from which you will sew a blouse and attach to it any purchased sweater of your child, which is just in size for him. Circle the outline from it, and here the patterns are ready.
You can mentally divide the jacket into sleeves, front and back body parts. Do not forget that with this method, for each part you need to cut already doubled fabric, or, if the parts are from one layer of fabric, in its mirror image.
Stage 2
If you want to see on your child not a sweater, but a vest, then do not sew on the sleeves. The scheme for the body remains the same. Parts are stitched together from the inside. Cut edges are processed on the overlock, then they are tucked into one or two layers and stitched.
Stage 3
For decoration, you can sew a visor on the shoulder of a vest of a different color. To do this, take the desired fabric, cut out a 10 × 15 cm rectangle from it and fold it in half. Sew it to the inside of the fabric with the cut edge so that the curled edge remains hanging over the child’s shoulder. Hide all edges in a seam so that sections would not be visible.
Stage 4
Sew large buttons on the chest. Tie a belt on your stomach.
DIY gnome costume for a boy: shorts or pants
Now sew pants or shorts. If you want to sew shorts, then the suit can be supplemented with striped golfs - leggings.
Stage 1
Measure the baby’s waist and the height of the leg from the thigh to the bottom and from the groin to the bottom. Divide the circumference of the belt in half, as the fabric will be cut and sewn when folded.
Stage 2
Fold the fabric in four layers and transfer the dimensions to the drawing. Make a pattern like this.

The diagram shows that the pattern is applied to the fabric, folded in 4 layers. Next, you will get two details. Sew them together along the upper side seams. Next, twist the product so that the seams pass in the middle, and two parts lie on their sides folded in half.
Stage 3
Sew long sections in half folded parts together. It will be a seam between the legs.
Stage 4
Tuck and stitch the remaining sections on the waist and legs. In the tucked up fabric, you can scribble or insert an elastic band that will hold the pants on the belt and tighten in the ankle. If the trouser leg is much wider than the leg, then the elastic band, tightening the lower part, will emphasize the splendor of the suit.
If you decide to sew shorts, then they are made according to the same pattern, only shorter in the length of the leg.
DIY gnome costume for a boy: cap

It’s very simple to make such a cap. You will need only two details: a cone with a rounded bottom and a rectangle. The width of the rectangle is 20-22 cm, the length is equal to the length of the girth of the head.
Stage 1
Measure the head circumference with a centimeter tape. Transfer the resulting dimensions to the fabric. The length or height of the cap is up to you to decide. If you make it very long, then the tip can be tied into a knot, as shown in the picture.
Stage 2
Cut and sew the resulting parts together. The hood for the cap can be of different shapes and colors. Contrast tulle looks beautiful and emphasizes the headgear.
One of the decoration options can be cloves made on it. In this case, sew it from one flat edge and twist it with the other.

It can also be made two-layer, which will give it additional rigidity.
DIY gnome costume for a boy: shoes
Shoes are also an important attribute in a suit. The gnome will turn out to be completely fabulous or not complete without beautiful shoes with bent noses and bells at the end. You can make them in several ways by pattern.
Shoes will require colored felt or thick fabric and a thick sturdy thread. You can use several colors of fabric and make the sole of one color, and the edges of another. You can also make shoes with one color inside and another outside. When you put them on your legs and twist the edges, it will be interesting to look.
Option 1

For this type of shoes you will need to make the following pattern and cut out the details.

Stage 1
Be sure to measure the length of the baby's foot and the height of the lift from the heel to the ankle and transfer the dimensions to the fabric. This is important, because if the baby is not comfortable in these shoes, then he will not feel the joy of the holiday.
Stage 2
Apply the pattern to the fabric according to the pattern shown above. Cut and sew the resulting parts together. Part A in the figure is the upper part of the boot, and part C is the lower part or sole.
If you want, you can stitch the details with a sewing machine, or you can sew with your hands. As a rule, the work is done manually with a buttonhole stitch, because it does not require much time and effort.

The buttonhole looks like this and is sewn by hand using a regular needle and thread. It processes the cut edges of fabric or paper.
Stage 3
Garnish the shoes with bells or bumbons that are sewn onto the sharp ends of the noses. You can also sew a bow from a satin ribbon on the boot tongue.
Option 2

This image shows the pattern and the final result. You can, as well as with the first option, use several colors and types of fabrics.
Stage 1
Measure the size of the foot and the height of the child’s feet.
Stage 2
Draw measurements on the fabric and cut. Sew them together manually or with a sewing machine. Garnish with bumbons, bells and bows as desired.