Crocheted knitted napkins are an integral part of everyday life since childhood of your beloved home, where it is always cozy and warm. Such associations can be presented to your loved ones by learning how to crochet napkins. They can be connected both according to classically motivated, and in a modern way, in the most unusual ways. They can be of any fancy shapes and patterns - from the most delicate laced lace details, to the strict minimalism of lines and weaves.
Crocheted with napkins work with interest as experienced needlewomen and novice knitters. Crochet knitting patterns for napkins will interest all hosts without exception, and the finished product will not leave anyone close to indifferent. Remember that crocheted napkins are not only a beautiful decoration, but also an original gift for a long memory.
Knitted crochet beautiful napkins - description schemes
We proceed to the study of crochet options for these air products, the main property of which is to keep a cozy place in the house. A diagram and detailed descriptions of the progress of work will greatly facilitate this task.
Immediately it should be noted that beginners should not be afraid of complex schemes and descriptions. Knitting napkins crochet for beginners is quite affordable, the main thing to learn quickly, you need to choose a few simple knitting options to start. Let's start with simple crochet examples, and then we will look at more complicated, but certainly interesting options for knitting napkins.
Simple
It is worth starting with crochet napkins - it is from simple plexuses, eyelets and rings that will help you quickly get comfortable and move on to more complex and interesting knitting patterns for these lovely items.
Flower motif

If we talk about knitting for beginners - a simple crochet napkin with a floral motif is always a good idea. The diameter of our future napkin is 15 cm. It is suitable as decoration for any part of the house.
Preparation for knitting napkins:
Yarn- YarnArt Jeans of suitable color -12 g, in 50 g - 160 m;
Hook - №2.
Abbreviations designations to the scheme:
STBN - column without nakida;
STSN - double crochet;
CCT- connecting column;
VP - air loop;
PSST- semi-column with cap.
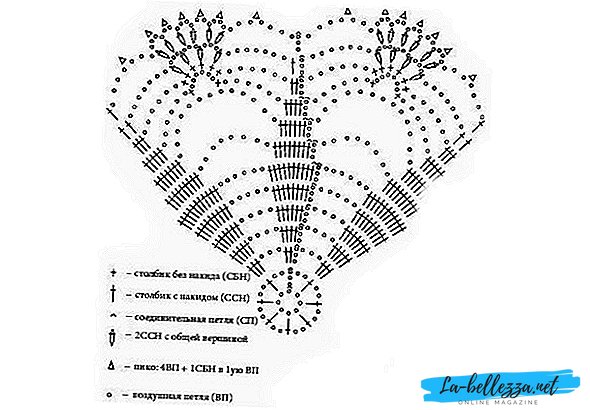
The scheme of knitting and crochet napkin description:

Recruit a chain of 8P. We join them into a ring and follow the further scheme of work step by step.
1 row: 1 VP, 16 STBN, CCt;
2 row: At first, knitting the columns is replaced by the corresponding number of VP. * 1PStSN, 5VP * x 8;
3 row:knitting under the arch of 5 VP. CST * 5 STSN, 2 VP * x 8, CST;
4 row: In the following five columns of the previous row we knit like this: * 2 STSN, 3 STSN, 2 STSN, 2 EAP * x 8, Cpt;
5 row: passing the 2nd and 6th column, we knit 5 STSN with one base, 3 Vp, under 2 VP - 1 StSN, 2 VP, 1 StSN * x 8 * CCt;
6 row: under all arches from VP we knit * 1 STSN, 2 VP, 1 STSN, 3 VP * CCt;
7 row: We start with knitting CCT under the arch and knit * 1 STSN, 3 VP, 1 STSN, 3 VP *, skip one arochka and repeat knitting from * to *. We finish a row - 1 VP, 1 PSTN;
8 row:* 1 StBN under the arch, 5 StSN under the following *, CST.
We cut the thread, fasten.
Sunny lace

Our napkin is perfect for vases, cups or glasses. Its diameter will be 12.5 cm.
Preparation for knitting napkins:
Yarn - Narcissus (100g - 395m, 100% mercerized cotton);
Hook - №2.
Abbreviations designations to the scheme:
SSN- post with one double crochet;
VP- air loop;
SP - connecting loop;
Picot - 3 VP connected to the joint venture in the first loop;
Sc - single crochet.
The scheme of knitting and crochet napkin description:

8VP, SP.
1 row: 3VP, in a circle knit 15 CCH, SP in the 3rd VP;
2 row: 5VP, * 1CCH in CLO of the previous row (OL), 2 VP *, SP in the 3rd VP;
3 row: 1SP to 4th VP, 3VP and 3CCH knit with one common vertex - in the arch of PR, 4VP, * 4СНС with a common vertex in the arch of PR, 4VP *, SP in the 3rd VP;
4 row: 1VP, to the common vertex 1СБН, * to the arch of the previous row 5ССН, 1СБН to the common vertex *, SP in the SCN;
5 row:3VP, * 3VP, 1СБН in the 3rd SSN of the previous row, 3VP, 1ССN in the SNS of the previous row *, joint venture in the 3rd VP;
6 row: 2SP in 4-5VP, * 1СБН in an arch, 5ВП *, the joint venture in СНН;
7 row: 4SP, * 1СБН in an arch, 5ВП *, the joint venture in СНН;
8 row:4SP, * 1СБН in the arch, 3ВП, in the arch (2СН, pico, 2СН), 3ВП *, the joint venture in СНН.
Oval
Oval napkins are associated with the comfort and warmth of a grandmother's house. There certainly were several crocheted napkins of elongated oval shape, which were passed with love from generation to generation. It is time to learn and we knit these heirlooms.
Napkin "Nostalgia"

An oval crocheted napkin with diagrams and descriptions will help you to link a great gift to loved ones who will surely remember something pleasant from the past with nostalgia. After all, these napkins are associated with warmth and comfort.
The size of our napkins is 24 × 46.
Preparation for knitting napkins:
Yarn - Cotton white (50 g - 208 m, 100% mercerized cotton);
Hook - № 1,5 - 1,75.
The scheme of knitting and crochet napkin description:

For the socket, tie a chain of 8VP and close it with 1 CCt in the ring. Next, knit in circular rows according to the scheme. Tie 4 sockets, connecting them together in the last row. Attach the thread at the arrow to knit around the outlets in circular rows according to the pattern.

Napkin "Openwork Waltz"

Another classic style oval crocheted napkin.
Preparation for knitting napkins:
Yarn - Threads Iris pink and blue (100% cotton, 25 g / 150 m); white yarn (40% cotton, 60% viscose, 100g / 400m);
Hook - № 1,15.
The scheme of knitting and crochet napkin description:

Step 1:Dial 45 air loops, then a single crochet into the 10th loop of the chain and then crochet 5 VP and st.b / n into the 6th loop of the chain, according to the diagram (photo 1).
Step 2:Having connected the connecting column at the end of the 1st row, start knitting a single crochet column, a double crochet column, a double crochet column, a single crochet column into each archea. Between these elements, knit 2 VP. Tying the bottom side, knit a ring of 8 VP, continue to tie up the upper part. At the end of this row, link the 4 VP and the column with 3 nakida in the VP of the first row. It will turn out a ringlet, as well as from the other end (photo 2).
Step 3:In the third row, knit arches from 5 or 6 VP according to the scheme (photo 3).
Step 4: Then knit 2 rows of arches and picos from 3 VP (photos 4 and 5).
Step 5:In the 6th row, alternate the chains of 5 VP and single crochets in the middle of the arches of the previous row (photo 6).
Step 6:Tie 5 crochets into each arochka, dividing them from the VP (photo 7).
Step 7:Next, knit 4 rows of arches from the VP, as shown in the diagram (photo 8).
Step 8:Tie one more row of crochets divided by VP (photo 9).

Step 9:Then follow 3 rows of 7 VP (photo 1).
Step 10:Getting to knitting with pink thread. In the diagram, the beginning of this series is indicated by a pink triangle. We knit an arch from 7 VP, then st.b / n and turn the work (photo 2).
Step 11: Proayazhite 14 st.b / n in this arch in the opposite direction (photo 3).
Step 12:Again we turn the work. Knit 3 VP lift, *2 VP, Art.S / N *, repeat from * to * 7 times. Continue knitting according to the pattern (photo 4).
Step 13: When you knit the next such item, instead of 3 VP of lifting, knit 3 connecting columns, turn the work, and continue crocheting the napkin according to the scheme (photo 5).
Step 14: Finishing this series, tie 4 VP and Comm. column (photo 6).
Step 15: Now knit the blue thread in accordance with the scheme (photo 7).
Step 16:Increase the number of VPs between the double crochets (photo 8).
Step 17:In the last row, knit 3 VPs, 3 double crochets with a common top, and a pic of 5 VP, 3 VP (photo 9).

Round
Round napkins are the most popular type among all possible crocheted napkins. The variety of patterns and patterns is impressive for both novice and experienced craftswomen. Consider several options for knitting patterns with descriptions.
Napkin "Winter's Tale"

The diameter of the future round napkin will be equal to 20 cm.
Preparation for knitting napkins:
Yarn- Narcissus (100% mercerized cotton, 100 g - 395 m);
Hook - №2.
Abbreviations designations to the scheme:
SP- connecting loop;
VP- air loop;
SSN- post with one double crochet;
Sc - column without nakida;
[… ] , *… *- repetition;
ETC - the previous row;
BUT- common vertex, i.e. 2 CH knit together;
Picot- 4VP and 1SBN in the first VP.
The scheme of knitting and crochet napkin description:
8VP, SP.
1 row:5VP, * 1CCH, 2VP *, joint venture in the 3rd VP; Starting from the second row - at the beginning of each row we knit on 3VP.
2 row:in the beginning of the series there are another 2CCH, * 3VP, 3CCH in 1CCH PR *, a joint venture in the 3rd VP;
3 row:2ССН in each PRN PR, * 4VP, 5ССН (on 2ССН in extreme СН and 1 ССН in average) *, joint venture in the 3rd VP;
4 row: 6CCH (2CCH in each CCH to extreme CCH PR and 1CCH in the middle), * 4VP, 7CCH (according to the same pattern as in row 3 - adding to each free CCH in the middle of 1CCH) *, joint venture in the 3rd VP ;
5 row:8SSN (according to the 4th row scheme), * 5VP, 9SCN (according to the 4th row scheme), joint venture in the 3rd VP;
6 row:10SSN, * 6VP, 11SSN *, joint venture in the 3rd VP + 1SP;
7 row:8CCH (leaving at the end of 1CCH PR free), * 8VP, 9CCH (leaving both sides of 1CCH free) - form a rhombus, joint venture in the 3rd VP + 1SP;
8 row:6SSN, * 13VP, 7SCN *, SP in the 3rd VP + 1SP;
9 row:4SSN, * 6VP, (1SBN, 6VP, 1SBN) - in the middle of the arch, 6VP, 5SSN *, SP in the 3rd VP + 1SP;
10 row: 2SSN, * 6VP, in a small arch 6SNB, 6VP, 3SSN *, SP in the 3rd VP + 1SP;
11 row:1CCH, [7VP, in the 4th medium SNP PR - * 2CCH with A, 3VP *, 7VP, 2CCH], SP in the 3rd VP;
12 row:4VP, pico, [3VP, in arches from VP PR - * 2CCH with A, 2VP, pico, 2VP, 2CCH with A *, 3VP, pico, 4VP, 1CCH], SP in the 3rd VP.
Napkin "Tenderness"

A more complex version of a round napkin, but the end result will surely please you. The finished product from the hook will be 36 cm.
Preparation for knitting napkins:
Yarn- Pekhorka "Successful" blue, 100% mercerized cotton (50 g -220 m);
Hook - №2.
Abbreviations designations to the scheme:
StbSN- double crochet;
VP- air loop;
Pet - a loop.
The scheme of knitting and crochet napkin description:

We collect eight VP, closes in a circle.
Each next row, we start with knitting 3 VP, which we replace 1 StbSN.
We finish each row with a connecting column.
1 row:* 2 StbSN, 2 VP * - repeat 8 times;
2 row:* in each STSN of the previous row, we knit 2 StbSN, 2 VP * - repeat 8 times;
3 row: * 2 StbSN in one pet, 1 StbSN each knit in the next two loops, 2 StbSN in one pet, 2 VP *, repeat until the end of the row;
4 row: * 2 StbSN in one pet, 1 StbSN knit in the next four loops, 2 StbSN in one pet, 2 VP *, repeat until the end of the row;
5 row:* 2 StbSN in one pet, 1 StbSN each knit in the next six loops, 2 StbSN in one pet, 2 VP *, repeat until the end of the row;
6 row: * 2 StbSN in one pet, 1 StbSN each knit in the following eight loops, 2 StbSN in one pet, 2 VP *, repeat until the end of the row;
7 row:* 2 StbSN in one pet, 1 StbSN each knit in the next ten loops, 2 StbSN in one pet, 2 VP *, repeat until the end of the row;
From 8 to 22 row knit according to the scheme.
Square
Not too popular form for napkins crocheted, but also interesting, both visually and in work. Needlewomen can try out several knitting options according to the following schemes with descriptions.
Napkin "Pineapple Fantasy"

Preparation for knitting napkins:
Yarn- white color YarnArt Jeans, 55% cotton, 45% acrylic (50 g -160 m);
Hook - №2.
Abbreviations designations to the scheme:
SSN - double crochet;
Sc- column without nakida;
VP- air loop;
C3H - A column with three naquids;
SP - connecting loop.
The scheme of knitting and crochet napkin description:

Important: with further knitting, do not forget to replace the lifting 3 VP on 1 CCH. Knit according to the description, but looking at the scheme so that all moments in knitting are clear.
1 row:we start with a sliding loop and knit 3 VP, 1 CCH, 5 VP, * 2 CCH with a common vertex (cluster), 5 VP; repeat six more times. At the end of a row instead of five VP, we knit 2 VP and 1 SSN into the initial cluster. It turned out eight arches of five VP;
2 row: * 6 VP, Sc under the next arch of five VP; repeat from * to the end of the row, finish the row with three VP and 1 CCH in the CH column of the first row;
3 row:7 VP (equal to 1 SSN + 4 VP) and in the first aroch we knit * 6 CCH, 4 VP, 1 CCH under the next arch, 4 VP; Repeat from * to end of row. We finish the series of joint ventures in the third VP;
4 row:4 VP (equal to 1 SSN +1 VP), 1 SSN in the same loop, 4 VP, over each SSN of the third row we knit 1 SSN and 1 EP between columns, 4 VP, * (1 SSN, 1 VP, 1 SSN) in column of the third row SN, 4 VP, over each CLO of the third row we knit 1 CCH and 1 EP between the columns, 4 VP; Repeat from * to end of row. We finish the series of joint ventures in the third VP;
5 row:* 4 VP (hereinafter we knit as 1 CCH + 1 CW), 1 CCH under the CI of the fourth row, 1 CW, 1 CCH per double crochet, 4 CW, 1 SBN under the first CW of the fourth row (4 CW, 1 CW under VP ) - three more times, 4 VP; Repeat from * to end of row. We finish the joint venture in the third VP;
6 row:* 4 VP (hereinafter we knit as 1 CCH + 1 VP), 1 CCH for the first CAP, 1 CAP, 1 CCH for the CH column, 1 CPS, 1 CCH for the VP, 1 CPS, 1 CCH for the CC column, 4 CW, 1 sc under the first arch, (4 VP, 1 sc under the arch) - 2 more times, 4 VP; Repeat from * to end of row. We finish the joint venture in the third VP;
7 row: * 3 VP (hereinafter we knit as 1 SSN), (1 VP, 1 SSN) - 7 more times, 4 VP, 1 SBN in the first arochka, 4 VP, 1 SBN under the arch, 4 VP, 1 SBN under the arch, 4 VP; Repeat from * to end of row. We finish the joint venture in the third VP;
8 row: * 3 VP (hereinafter we knit as 1 CCH), (2 CPS, 1 CCH) - 7 more times, 4 CPS, 1 SCN in the first arochka, 4 SC, 1 SCN for the arochka, 4 CC; Repeat from * to end of row. We finish the joint venture in the third VP;
9 row: * 3 VP (hereinafter we knit as 1 CCH), (3 CPS, 1 CCH) - 7 more times, 4 CPS, 1 SCN in 1 - th arochka, 4 CPS; Repeat from * to end of row. We finish the joint venture in the third VP;
10 row: 5 VP (hereinafter we knit as 1 С3Н), * (1 VP, 1 СН in a column of СН, 1 ВП, 2 СНН under an arochka, 1 ВП) - 7 more times, 1 СН, 1 ВП, 2 С3Н with a common vertex ( see diagram); Repeat from * to end of row. We finish 1 С3Н and SP in the fifth EP;
11 row:we will knit in each column of the CH of the tenth row. * 4 VP (hereinafter we knit as 1 CCH + 1 CW), 1 CCH, pico from three CW, 1 CW; Repeat from * to end of row. We finish the joint venture in the third VP.
The thread is cut and refilled. After that, a square small napkin needs to be stretched and steamed with a hot iron or wet with a stretch, fastened with pins and allowed to dry.
Napkin "Easter motive"

A napkin that will look great both as a decoration during spring holidays and playfully decorate a nursery will be 23 * 20 cm, and with a strapping - 26 * 23 cm. Such a crochet version is called sirloin knitting.
Preparation for knitting napkins:
Yarn- 36 g of yellow yarn Pekhorka Gentle (50 g - 150m, 50% acrylic - 50% cotton);
Hook - №2;
Needle- stupid.
The scheme of knitting and crochet napkin description:

We have a total of 23 cells. In order to calculate the required number of VPs for the first chain, it is necessary to multiply 23 by 3 and then add another 3 VP for the turn chain. Total 72 loops. And we remember that the filled cell is 2 CCH inside the cell, and the empty one is 2 VP. Even rows are read from left to right, and odd rows are read from right to left.
1 row:We start knitting with 4VP chains, since our first cell is full. If the cell needed was empty, then it would be necessary to add another 2 VP and knit in the 8th VP. We knit CCH in each loop of the chain to the end of the row. As a result, it should be 70 CCH, taking into account the 3 lifting loops, replacing the first CCH (photos 1 and 2).
2 row: We start with 3 VP of ascent, then 2 CCH (this is a filled cell) and another 1 CCH, then 2 CAP, skip two at the base and in the third - 1 CCH, and again 2 VP, in the third CCH and so on until the last cell according to the scheme which must be filled, i.e. At the end of the row, you should have 4 CLO. The row ends with a CLO in the 3rd air lift loop. In total, you should have 23 cells in a row, two of which should be filled along the edges, as in the photo below (photo 3,4,5).
3 row:drawing here begins. Focusing on the scheme of knitting. This odd series is read according to the scheme from right to left. 1 cell - filled, then 8 empty cells, 5 filled (it should be 16 CCH), 8 empty, 1 filled. The filled cells fit under the arch of the air loops (photo 6).
4 row:1 cell - filled (4 CCH), 6 - empty, 2 - filled (7 CCH), 5 - empty, 2 - filled (7 CCH), 6 - empty, 1 - filled (4 CCH). The row is read from left to right. If the gaps in the filled cells are too large, this means that the loops are too loose and you need to replace the hook with a smaller size in order for the knitting to become more dense (photo 7).
Next, knit according to the scheme from 5 to 17 rows.
18 row:1 cell - filled (4 CCH), 1 - empty, 1 - filled (4 CCH), 2 - empty, 4 filled (13 CCH), 2 - empty, 2 - filled (7 CCH), 1 - empty, 4 - filled (13 CCH), 2 - empty, 1 - filled (4 CCH), 1 - empty, 1 - filled (4 CCH). The row is read from left to right. In order to easily check if you have not missed the CCH in a row, count the number of filled cells in a row, then multiply by 3 and add 1. For example, you have 10 filled cells in a row, this means you have to tie: 10 cells * 3 CCH + 1CCN = 34 SSN. Accordingly, 10 filled cells are equal to the 34th CCN (photo 8).
Next, knit according to the scheme up to 28 rows inclusive.
29 row:These are only empty cells, except the first and last, which are the frame of our knitted chicken.
30 row:The whole is their CLO. There should be 70 pieces (photo 9).

Next, we make a beautiful strapping according to the following scheme, so the canvas will turn into a beautiful napkin with a finished edge.
Crochet wipes and description:

We turn the work to face and immediately knit 1 CCH into the 4th loop from the beginning, without adding any lifting loops.
Having tied the first CCH, we make a pic of 3 air loops, fasten it with a connecting pole to the first air loop.
Then again 1 CCH in the same loop of the base and picot. So you should have 6 CCH in one loop and 5 picos between them.
Now fasten the same in the fourth loop connecting column. And again in 4 loop we knit 6 CCH with picot.
On the side of the fasteners and decoration itself are attached every 2 rows in a side loop.
Tighten the eyelet and hide the thread with a needle with a blunt end into the knitting. Next, wash, iron-steam. After washing all the loops will fall down and finally flatten out after ironing.
Japanese
Вязание салфеток крючком в японском стиле не подойдет начинающим вязальщицам, ведь важная часть работы заключается в сложностях линий, петлях и кольцах, сплетенных в особый узор, превращающийся в незаурядный цветочный мотив. Японская салфетка крючком - это высший пилотаж вязания, который позволяет выполнять очень необычные салфетки, интересные и оригинальные.
Салфетка «Вишневый сад»

Эта салфетка составляется из нескольких отдельных мотивов.
Подготовка к вязанию салфетки:
Пряжа- Ирис белого и розового цвета;
Крючок - №1;
Сокращения обозначений к схеме:
VP- воздушная петля
PS - полустолбик (присоединительный столбик)
СБН - столбик без накида
С1Н- столбик с одним накидом
С2Н- столбик с двумя накидами
С3Н - столбик с тремя накидами
Описание работы над салфеткой крючком с фотографиями:

Начинаем вязание мотива пряжей белого цвета. Цепочку из 14 ВП замыкаем в кольцо полустолбиком.
1 ряд:3ВП и 27 С1Н в колечко (фото 1).
2 ряд: 4ВП, *С1Н, 1ВП * , С1Н - всего 13 столбиков, провязанных под каждую петлю 1-го ряда.
В конце ряда набираем 3ВП и вытягиваем длинную петлю для того, чтобы вязание не распустилось (фото 2).
Теперь берем пряжу розового цвета. Набираем 14 ВП, вводим полученную цепочку под колечко белого цвета, замыкаем в кольцо полустолбиком и вяжем 2 ряда так же, как и пряжей белого цвета (фото 3).
Далее соединяем последнюю петлю розового цвета с первой петлей 2-го ряда белого колечка полустолбиком (фото 4).
3 ряд: над каждой ВП последнего ряда белого колечка вяжем С1Н, а между ними - 1ВП, пико из 3ВП, 1ВП. В конце ряда вытягиваем длинную петлю и оставляем вязание (фото 5).
Возвращаемся к белому колечку, соединяем его с розовым и вяжем аналогично 3-й ряд.
Последнюю петлю белого колечка соединяют с розовым, а розового с белым.
Лишние нити обрезаем и аккуратно прячем с изнаночной стороны, протягивая крючком через петли между рядами. В результате получилось 25 мотивов и сшитых между собой иголкой с ниткой (фото 6).
Салфетка «Японский мотив»

Подготовка к вязанию салфетки:
Пряжа- белую пряжу Madame Tricote Maxi (мерсеризованный хлопок, в мотке 100 г на 565 м);
Крючок - №1;
Схема и описание работы над салфеткой крючком с фотографиями:
На этой схеме японской салфетки ряды четные и нечетные окрашены в разные цвета. Несмотря на то, что в салфетке всего 12 рядов, включая завершающий ряд обвязки столбиками без накида, размер готового изделия - 33 см.
1 ряд: Вокруг кольца амигуруми - 1 в.п. и 11 ст. без накида; закрыть ряд соединительной петлей (фото 1).
2 ряд:16 в.п., столбик с 2 накидами в 4 в.п. начала этого ряда; столбик с 4 накидами, провязанный вместе с предыдущим столбиком с 2 накидами; *7 в.п., столбик с 2 накидами в центр предыдущего столбика с 4 накидами, столбик с 4 накидами, провязанный вместе со столбиком с 2 накидами* - повторять от * до * до конца ряда, 7 в.п., столбик с 2 накидами в центр предыдущего столбика с 4 накидами, закрыть ряд соединительным столбиком в 9-ую петлю начала этого ряда (фото 2).

3 ряд:10 в.п., столбик с 4 накидами, 9 в.п., столбик с 5 накидами в 4-ую в.п. начала этого ряда (фото 1). Затем сделать 2 столбика с 3 накидами в центр предыдущего столбика с 5 накидами (фото 2 и 3).

9 в.п., 2 столбика с 4 накидами, провязанные вместе в 4-ую в.п. начала этого ряда (фото 1). Вяжем 7 в.п.,* 7 ст. с 4 накидами, провязанные вместе (фото 2 и 3).

7 в.п., 1 ст. с 6 накидами и 1 ст. с 4 накидами в третий накид предыдущего столбика, провязанные вместе.

9 в.п., 1 ст. с 5 накидами, провязанный в третий накид столбика с 6 накидами (фото 1). Вяжем 2 столбика с 3 накидами, провязанные в центр предыдущего столбика с 5 накидами (фото 2 и 3).

9 в.п., 2 ст. с 4 накидами, провязанные вместе, в третий накид того же столбика с 6 накидами (фото 1). Затем делаем 7 в.п.* - повторить от * до * до конца ряда; затем - 7 в.п. и закрыть ряд глухой петлей в 10 в.п. начала этого ряда (фото 2).

4 ряд:Перейти полустолбиками на вершину цветочка. 5 в.п., *2 ст. с 3 накидами, провязанные вместе, 8 в.п., 1 ст. с 4 накидами, из которых провязать только 3 и сделать в ту же точку еще 2 столбика с 3 накидами, провязать их вместе, и только затем довязать последний накид столбика с 4 накидами*.

От * до * - это лепесток. 5 в.п., лепесток, 5 в.п., лепесток, 5 в.п., лепесток. Далее связать 7 в.п. (фото 1). Следующий маневр - конструкция-башня, призванная стянуть воедино 4 дуги из воздушных петель предыдущего ряда. Вяжем так. 1 tbsp. с 3 накидами, из которых провязываем только два (фото 2).

Вокруг следующей дуги - столбик с 2 накидами (столбик не закрываем). Повторить вокруг следующих двух дуг столбики с 2 накидами (фото 1). Все 4 столбика провязать вместе и довязать первичный столбик с 3 накидами (фото 2).

*7 в.п., 5 лепестков, разделенных 5 в.п.; 7 в.п., «стягивающая башня»* - повторять до конца ряда. Закрыть ряд так: 5 в.п., 1 ст. с 1 накидом в 5-ую воздушную петлю начала этого ряда (фото). После чего связать 5 ряд. 3 в.п., столбик с 1 накидом в следующую дугу из в.п.

9 в.п., *столбик с 2 накидами, из которых провязываем только один; столбик с накидом вокруг следующей дуги, провязанный вместе с первым столбиком; провязываем оставшийся накид столбика с 2 накидами*. От * до * - пусть будет конструкция с условным названием «эйфелева башня».

Дальше вяжем: *6 в.п., эйфелева башня* - повторить трижды от * до *. Далее - 7 в.п., «стягивающая башня» - 7 в.п., эйфелева башня, *6 в.п., эйфелева башня* - повторить от * до * еще 4 раза. И затем опять 7 в.п., стягивающая башня и т.д. до конца ряда. Закрыть ряд глухой петлей согласно схеме.
6 ряд: 6 в.п., 2 ст. с 3 накидами, провязанные вместе; 7 в.п., 3 ст. с 3 накидами в ту же самую эйфелеву башню предыдущего ряда + 3 ст. с 3 накидами в следующую эйфелеву башню предыдущего ряда, провязанные вместе; 7 в.п., 3 ст. с 3 накидами, провязанные вместе, в ту же эйфелеву башню предыдущего ряда, 7 в.п. и еще раз 3 ст. с 3 накидами + 3 ст. с 3 накидами в следующую эйфелеву башню, провязанные вместе. Последняя дуга из в.п. вяжется так: 5 в.п. and 1 tbsp. с 1 накидом.
Всего получается в каждой эйфелевой башне предыдущего ряда - по 3 лепестка из 3 ст. с 3 накидами, провязанных вместе, и разделенных между собой 7 в.п., при этом на стыке трехлепестковых кустиков столбики двух соседствующих лепестков провязываются вместе (фото 1).