In ancient times, Russians celebrated New Year in March.
The holiday lasted a whole week and was accompanied by mass festivities. Each day of the week was marked by its rite: when to mother-in-law to length, when to relatives, when to dead ancestors. Mandatory was the burning of a large effigy.
So rejoiced at the arrival of the new spring sun and the beginning of the New Year.
Scarecrow on Maslenitsa do-it-yourself broom
Making such a small stuffed animal can be entrusted to children. It is done in 1 hour from improvised means. To do this, you need to buy in advance in the store a regular broom for the home.

Materials and tools: broom, thin satin ribbon, thick wire for the base of the doll, scissors, nippers.
Stage 1
The purchased broom is taken and sorted into twigs. With the help of nippers, the thickest twigs are separated from the broom. The work requires only soft and thin straws. Solid - not needed.
Stage 2
A bundle of straws is bent on a wire, the ends of which are bent with pliers into the bundle. The resulting bunch will become the head for a stuffed animal made by hand.
Stage 3
In the same way, the body and skirt for the scarecrow are formed. Here you need to use a bundle with a lot of straw.
Stage 4
The head is mounted on the body. In the neck, twigs are tied with a satin ribbon. In the waist area - it’s too early.
Stage 5
A bundle of straws for the hands is taken. Immediately for both. The bundle is inserted into the middle of the body. The satin ribbon of the chrysalis bandages the wrists. Excess sticking straw is cut off.
Stage 6
With a ribbon of satin, the effigy is tied tightly to the waist. It is recommended to manually fluff the skirt.
Stuffed DIY carnival ready!
Do-it-yourself scarecrow on Maslenitsa
Such a craft will require more attention and perseverance. The scheme of its creation is a bit more complicated than the previous chrysalis. The peculiarity of this stuffed animal in the material used is bast.

Materials and tools: a small stick 50 cm long, brightly colored fabric, children's tights, an old children's shirt, bast, cardboard, thread, satin ribbon, cotton wool or wrinkled paper, transparent adhesive tape, colorful felt-tip pens.
Stage 1
The most common stick found in the forest is taken. It is not required to process it or chop off the existing knots. The head is made of fabric. A piece of thread is tied at the top of the fabric. Cotton or crumpled paper is stuffed inside. The resulting design is mounted on a stick. The fabric is tied with thread in the neck.

Stage 2
Purchased in a hardware store, a bast wraps around a stick. The straws are evenly distributed and manually fixed with a thread.
Stage 3
Cardboard is taken to create the hands. It is folded into 2 tubes and wrapped with duct tape. The resulting tubes for a stuffed animal with their own hands are wrapped in one long fabric. It is fixed on improvised handles with threads. The resulting workpiece leans behind the scarecrow in the area of the hands. She is tied to the torso.
Stage 4
Children’s tights are taken. They are stuffed with cotton. In the area of the ankles and knees for visual beauty, you can bandage with satin ribbons or threads.

Stage 5
In children's tights, cotton wool or crumpled paper is stuffed to give the effigy outlines of the chest. Then they are attached under the neck.
Stage 6
An old shirt is put on a scarecrow, which is tied at the waist with a ribbon.

Stage 7
The resulting scarecrow is painted on Maslenitsa's face. To do this, you can use felt-tip pens. Let the face turn out kind.

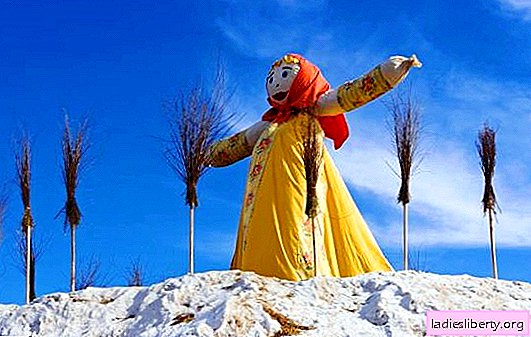
Scarecrow on Maslenitsa for festivities
This stuffed animal is made specifically for burning during festivities. It burns quickly and there is little smoke from it.

Materials and tools: two thick long sticks (one must be curved), fabric for a skirt and shirt, fabric for the head, large quantities of straw, linen yarn, yellow cardboard for making the sun, twine or jute thick thread, scissors, thread and needle, sewing typewriter, felt-tip pens.
Stage 1
Two sticks are fastened together crosswise. The curved shape of the stick will be hands-on. Their direction, if desired, can be up or down. The center stick should protrude more than 1 meter from the doll down. You can fix the sticks with a jute thread or a nail. Since tradition requires that a scarecrow be burned without a trace - it is better to use a thread fastener.
Stage 2
Hands are formed from straw. They are attached to the body with a thread.
Stage 3
From bunches of straw, a breast is formed and tied with thread.
Stage 4
A fluffy skirt is gathered from straw. At the waist, the straw is tied with thread for reliability.
Stage 5
Do-it-yourself stuffed animal wears fabric as a skirt. She is tied at the waist.
Stage 6
From another fabric, a shirt is worn on a straw doll and is also tied with thread at the waist and elbows.
Stage 7
Two circles are cut out of yellow fabric. Manually, it is sewn with a needle and thread. During stitching, straw is packed inward.
Stage 8
From the yarn to the sun's head, hair is made. To do this, the thread is cut into lengths of 20 cm. Then they are laid out on plain paper one after the other from top to bottom vertically. On the sewing machine, a seam is laid in the middle. If you take your hands by the seam - the pieces of yarn will fold by themselves in half. For this seam, the resulting hair is sewn manually to the doll.
Stage 9
Yellow cardboard is made like a sun. To do this, the sheets are first glued into a large square. It should be larger than the circumference of the head. A sun with rays is cut out from the square with scissors.
Stage 10
A cardboard sun is sewn up behind the head of a stuffed animal. It is important to sew in several places. A strong gust of wind will easily tear off the unreliably sewn sun.
Stage 11
Felt-tip pens on a Pancake week draw eyes, eyebrows, a nose, a smile and a blush. For reliability, all this can be pre-drawn with a sewing pencil, which comes with a colorless marker to erase drawn lines. It can be purchased at any sewing accessories store.
Stage 12
The last stage of work is soaking. In order for the resulting doll to burn well and brightly, you need to moisten it with liquid from water and saltpeter. It is recommended to work more carefully with explosive nitrate. It is better to carry out the final manipulations away from children: in the garage, on the street, in the utility room.
The resulting doll is required to dry well before burning.
Scarecrow is ready!